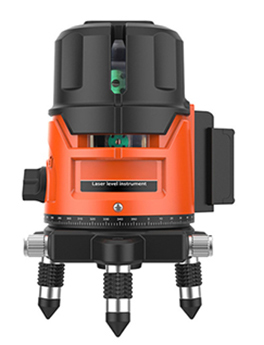
 The best laser level should meet the following conditions
- The level axis of the vial should be parallel to the collimation axis of the telescope's collimator. (Main condition)
- The collimation axis of the telescope does not change position due to focusing. (Main condition)
- The circular level axis should be parallel to the rotation axis of the rotary laser level. (Minor condition)
- The horizontal wire of the crosshair should be perpendicular to the rotation axis of the laser level. (Secondary condition)
Inspection before calibration
The principle of inspection and calibration sequence: The previous inspection items are not affected by the following inspection items.
Inspection method: The leveling axis of the level should be tested and calibrated equally with the rotating axis. The circular level bubble should be centered with the foot screw first, and then the laser level machine should be rotated 10 degrees. If the bubble is still in the center position, it means that this condition has been met. If the bubble shifts, it indicates that the condition is not met.
Laser level calibration (taking the 5 line rotary green laser level as an example)
The calibration of the 5 line rotary green laser level is carried out with the calibration screw installed under the circular level bubble. There are generally three screws. When operating and controlling, the three correction screws should be adjusted separately in the same way as the leveling circle level, so that the bubble is centered and moved to the center position by half of the length.
If the operation control is completely accurate, after calibration, the level axis is parallel to the rotation axis of the instrument. The laser line meter should first be placed and leveled according to the operating method of the level, and aimed at the target. Then, it is required to connect the laser power and turn on the power switch. After the laser starts up normally, adjust the working current to about 5mA. At this time, there will be the strongest laser output, and a bright red spot will be obtained on the target. When the light spot is not clear enough, you can adjust the focusing screw of the gun tube until it is clear. If the belt plate is installed, the light shift can be changed into a cross-shaped red line, so the reading accuracy can be improved. Different from the first level measurement, the laser level measurement is recorded by the ruler.
The laser marking instrument uses a semiconductor-pumped light source as a light source, and can emit a point-shaped light source with high collimation after a group of lenses are combined and integrated. After being dispersed by a special light field, a light with uniform brightness can be formed. Due to the special design of the prism to diffuse the light, this effectively avoids the shortcomings of weak light at both ends of the light that is generated after ordinary dysprosium is used to diffuse light. After spreading the light, the marking instrument can make the brightness of the two ends and the middle of the light be the same (visible by the naked eye). The analysis of the power test results shows that the error of the light intensity at both ends and the middle intensity is within 3%, so the naked eye cannot distinguish the difference in brightness. There are horizontal beads on the laser level, which can measure whether the horizontal surface is level. There are LED lamp beads on the laser level, so you can see the horizontal beads clearly even at night. The laser level meter can add magnet adsorption function. If the laser level equipment is leveled at this time, the rotation axis of the equipment is in a straight state. However, in practice, it takes many adjustments to complete.
The cross wire should be perpendicular to the rotation axis of the laser level device. How to check and calibrate?
First, you should aim at a point with one end of the cross wire, and then slowly rotate the telescope with a micro-motion spiral to observe the movement track of this point in the line of sight. The laser line meter is made by fixing the laser device on the telescope tube of ordinary level. The laser device consists of a helium-neon laser and a prism light guide system. If this point can always move on the horizontal wire, it means that the horizontal wire of the cross wire is perpendicular to the rotation axis of the instrument. If this point leaves the horizontal wire, it means that the horizontal wire is not perpendicular to the rotation of the instrument and equipment, and correction is required. The specific correction method is: use the correction tension of the fixed cross-hair loop. First of all, you need to loosen the correction nail to make the entire crosshair ring rotate. The laser marking instrument can clearly distinguish the light at a distance of 50 meters, which effectively solves the work intensity of manual marking. Then you need to make the horizontal wire coincide or parallel to the horizontal line. After the correction, the inspection will be carried out again until the requirements are met.

