
A feeler gauge is a thin, portable precision measuring tool designed to detect tiny gaps, clearances, and spacing between two adjacent surfaces. Unlike regular measuring tapes and rulers that only measure large dimensions, a feeler gauge provides ultra-thin thickness detection from 0.02mm to several millimeters, capturing micro gaps that ordinary tools cannot identify. It is an indispensable tool for automotive maintenance, mechanical assembly, woodworking calibration, and industrial quality inspection. For DIY enthusiasts, auto mechanics, factory technicians, and engineering workers, mastering how to use a feeler gauge correctly is essential for maintaining equipment accuracy, avoiding assembly failures, and ensuring project compliance. Many beginners and even experienced users encounter inconsistent readings, bent blades, and inaccurate gap detection due to non-standard operation and improper tool selection. This complete guide explains feeler gauge working principles, typical application scenarios, step-by-step usage methods, professional buying criteria, and common mistakes, helping users select and operate feeler gauges like industry professionals.
1. What Is a Feeler Gauge and How Does It Work?
A feeler gauge, also known as a gap gauge or thickness gauge, is a set of flexible metal blades with standardized, precise thickness markings. Each blade features an accurate fixed thickness value, used specifically for measuring narrow gaps, clearances, and spacing between mechanical parts, equipment components, and assembled structures. Feeler gauges are mainly divided into two mainstream types: metric feeler gauges and imperial feeler gauges, as well as straight blade and bent blade models for different working environments. Ordinary low-quality feeler gauges suffer from uneven thickness, blurred markings, and poor flexibility, which easily cause measurement errors. High-quality industrial-grade feeler gauges are made of high-toughness stainless steel, featuring wear resistance, rust proofness, and stable thickness accuracy, supporting long-term repeated use. The core working principle of a feeler gauge is simple and practical: users insert single or multiple stacked blades into the target gap, and the maximum thickness of the smoothly inserted blades equals the accurate gap size. This contact measurement method achieves precise micro-gap detection that visual observation and conventional tools cannot complete, making it widely used in various precision assembly and maintenance scenarios.

2. Common Application Scenarios of Feeler Gauges
Feeler gauges are versatile precision tools covering civilian DIY maintenance, automobile repair, mechanical processing, industrial assembly, and engineering inspection. Different usage scenarios require different accuracy levels, blade types, and thickness ranges. The following categorized practical scenarios help users match the right feeler gauge for their needs.
2.1 Automobile Maintenance & Repair
The automotive industry is the most common usage scenario for feeler gauges. Mechanics rely on feeler gauges to detect engine valve clearance, spark plug gap, brake pad gap, piston ring clearance, and chassis part spacing. Accurate gap detection ensures normal engine operation, stable vehicle braking performance, and reduced mechanical wear. Unqualified gap values will cause engine noise, weak power, and shortened component service life, making a feeler gauge a must-have tool for every auto repair workshop.
2.2 Mechanical Equipment Assembly & Calibration
Industrial mechanical assembly requires strict gap control between matching parts. Feeler gauges are widely used for detecting gear clearance, bearing fit gap, machine tool slide gap, and fixture assembly spacing. Precise gap calibration ensures flexible and stable equipment operation, avoids jamming and vibration caused by excessive or insufficient gaps, and improves the overall operating accuracy and stability of mechanical equipment.
2.3 Mold & Precision Industrial Inspection
In mold manufacturing and precision industrial processing, tiny gaps directly affect product qualification rates. High-precision feeler gauges are used to detect mold clamping gaps, stamping die gaps, and precision part fitting gaps. Industrial-grade feeler gauges with ultra-thin blades can capture micron-level gap deviations, ensuring processed products meet strict industrial tolerance standards and reducing defective rates.
2.4 Woodworking & DIY Home Maintenance
For woodworking enthusiasts and home DIY users, feeler gauges assist in calibrating saw blade gaps, planer tool gaps, and furniture assembly gaps. They help adjust the tightness of door and window hinges, check equipment fitting gaps, and ensure precise processing and assembly effects. Portable lightweight feeler gauges fully meet daily low-precision detection needs, improving the fineness of handmade and renovation projects.
3. Step-by-Step Guide: How to Use a Feeler Gauge Correctly
Accurate feeler gauge measurement depends entirely on standardized operation. Most data errors, blade bending, and detection failures are caused by irregular usage rather than tool quality problems. Below is the universal standard operation process applicable to all metric and imperial feeler gauges.
3.1 Pre-Use Inspection & Cleaning
Before measurement, thoroughly clean all feeler gauge blades and the measured gap surface to remove oil stains, dust, metal scraps, and sundries. Residual impurities will increase friction, cause blade jamming, and lead to inaccurate thickness judgment. Meanwhile, inspect the tool status: check for bent, deformed, rusted, or worn blades, and confirm all thickness markings are clear and complete. Damaged blades must be replaced in time to avoid measurement deviations.
3.2 Select Matching Blades & Trial Insertion
Judge the approximate range of the target gap first, then select a single blade with a suitable thickness for trial insertion. Follow the principle of "from thin to thick": start with a thin blade and gradually increase thickness until finding the most matching blade. Avoid directly using thick blades to force insertion, which will scratch the blade and damage the measured parts.
3.3 Accurate Measurement & Data Reading
Insert the qualified blade smoothly into the gap. The standard judgment is: the blade can be inserted smoothly with slight resistance, not too loose or completely stuck. If a single blade cannot match the gap accurately, stack multiple thin blades for combination measurement, and sum the thickness values of all used blades as the final gap data. Keep the blade flat and vertical during measurement, avoid tilting and twisting, and ensure stable and accurate readings.
3.4 Post-Use Cleaning & Standard Storage
After completing measurement, wipe each blade clean of oil and dust, flatten all blades and fold them back into the tool case in order. Do not leave blades unfolded or mixed randomly. Store the feeler gauge in a dry, ventilated, and moisture-proof environment to avoid rust and blade deformation. Long-term extrusion and high-temperature environments should be avoided to maintain blade flatness and measurement accuracy for long-term use.
4. Practical Feeler Gauge Buying Guide for Different Users
There is no one-size-fits-all feeler gauge. The best choice depends entirely on your actual usage scenarios and accuracy requirements. Many users blindly buy ultra-high-precision industrial tools for daily DIY or choose cheap inferior products for professional maintenance, resulting in cost waste or insufficient detection accuracy. The following targeted buying suggestions help all users select cost-effective and scenario-matched feeler gauges.
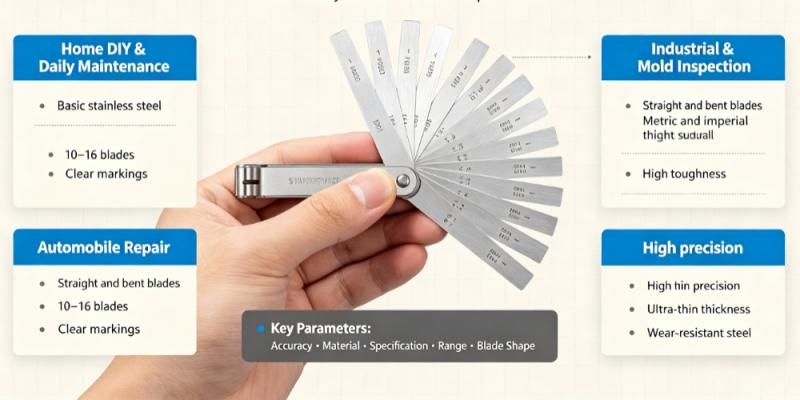
4.1 Core Parameters to Focus On
Thickness Accuracy: Accuracy is the core indicator of feeler gauges. Daily DIY and simple maintenance scenarios allow a small tolerance range; professional auto repair and industrial mold inspection require high-precision blades with strict thickness standards to ensure reliable detection data.
Material Quality: Prioritize high-quality stainless steel feeler gauges with high toughness, rust resistance, and anti-wear performance. Inferior iron blades are prone to bending, rusting, and thickness deformation after short-term use, leading to frequent measurement errors.
Metric & Imperial Specification: Choose the corresponding specification according to local usage habits and equipment standards. Metric feeler gauges are suitable for most domestic and Asian equipment maintenance, while imperial models are applicable to European and American mechanical and automotive equipment detection.
Blade Quantity & Thickness Range: Basic sets with 10–16 blades and a conventional thickness range meet daily needs; industrial detection requires complete sets with more blades and ultra-thin thickness coverage to cope with various complex gap sizes.
Straight & Bent Blade Design: Straight blades are suitable for flat and open gap detection; bent blades are designed for narrow, deep, and hidden gaps that are hard to reach, suitable for engine and internal equipment maintenance.
4.2 Targeted Selection Suggestions
For Home DIY & Daily Maintenance Users: Choose a portable, cost-effective basic stainless steel metric feeler gauge with 10–16 blades. It features simple operation, clear markings, and basic accuracy, fully meeting daily gap detection and assembly calibration needs.
For Automobile Repair Workers: Select a dual-purpose metric and imperial feeler gauge with both straight and bent blades, complete thickness range, and high toughness. It adapts to various hidden gaps of automobile engines and chassis, ensuring accurate maintenance data and durable long-term use.
For Industrial & Precision Mold Inspection Users: Prioritize industrial-grade high-precision stainless steel feeler gauges with complete blade combinations, ultra-thin thickness coverage, and high wear resistance. Strict thickness tolerance ensures zero-error detection for precision mechanical and mold processing scenarios.
5. Common Feeler Gauge Usage Mistakes & Solutions
Most measurement inaccuracies and tool damage are caused by incorrect operation rather than product quality problems. Summarized below are the most common user mistakes and practical solutions to help you avoid detection errors and extend tool service life.
Mistake 1: Forcing thick blades into narrow gaps Blind forced insertion causes permanent blade bending, deformation, and thickness deviation, resulting in inaccurate subsequent measurements.
Solution: Follow the thin-to-thick selection rule and insert blades gently without external force.
Mistake 2: Using dirty or rusted blades Oil, dust and rust on the blade surface increase actual thickness and cause false detection data.
Solution: Clean blades thoroughly before each use and keep the tool dry and rust-free daily.
Mistake 3: Random stacking of multiple blades Unordered blade stacking leads to uneven force and inaccurate total thickness calculation.
Solution: Stack blades neatly and flatly, and accurately sum the thickness values of each used blade.
Mistake 4: Improper storage causing blade deformation Long-term open placement and extrusion lead to blade bending and warping, losing measurement accuracy.
Solution: Fold and store blades in a dedicated case after use, avoiding extrusion and moisture erosion.
6. Conclusion
A feeler gauge is a practical, affordable, and essential precision detection tool that runs through home DIY maintenance, woodworking calibration, automobile repair, and industrial precision assembly. Mastering standardized pre-use cleaning, reasonable blade selection, accurate gap measurement, and scientific daily maintenance is the key to obtaining consistent and reliable detection data. Meanwhile, selecting a targeted feeler gauge according to personal usage scenarios and precision needs can effectively avoid purchasing pitfalls, reduce tool loss, and save maintenance costs. Whether you are a beginner DIY user or a professional industrial technician, correct operation and reasonable tool selection can maximize the performance of a feeler gauge, ensure assembly and maintenance quality, and improve overall work efficiency.