
A hand-held electric planer can remove rough, uneven wood quickly and make many woodworking jobs easier. It is useful for flattening boards, trimming doors, straightening edges, reducing board thickness, and smoothing rough lumber. However, getting a clean result is not simply a matter of turning the tool on and pushing it across the wood. Incorrect cutting depth, poor workpiece support, dull blades, or uneven pressure can leave dips, ridges, tear-out, or gouges.
This guide explains how to use an electric planer safely and effectively, even if you are using one for the first time. You will learn how the tool works, how to adjust the cutting depth, how to make smooth passes, and how to avoid common beginner mistakes.
Quick Overview of the Electric Planer
To know how to use an electric planer correctly, we need to first understand what an electric planer is, how it operates, what it can do, and what projects it excels at. This basic knowledge helps you avoid common beginner mistakes and use the tool safely. Once you get familiar with its strengths, you can decide if it fits your upcoming woodworking tasks.
What Is an Electric Planer?
An electric planer, also called a handheld power planer, is a portable woodworking tool that uses a rotating cutter head to remove a thin layer of material from a wood surface. Unlike a stationary thickness planer, you guide the handheld tool across the workpiece. Electric planers are commonly used for rough lumber, uneven board edges, door fitting, edge chamfering, and removing small amounts of material from wooden surfaces.
How Does an Electric Planer Work?
A typical electric planer has a rotating cutter drum fitted with one or more blades. The front and rear shoes support the tool while the cutter removes material between them. A depth adjustment knob changes how far the cutter extends below the shoe. A shallow setting removes less material, while a deeper setting removes more. The basic principle is simple: keep the planer flat, maintain steady forward movement, and remove material gradually rather than trying to take off too much wood in one pass.
What Can You Use an Electric Planer For?
A handheld electric planer is particularly useful when you need to remove a small amount of material quickly. Common applications include flattening rough lumber, fitting a door that is slightly too large, straightening an uneven edge, reducing the thickness of a board, and creating a chamfer along an edge. The handheld electric planers can also be useful for reclaimed wood, but reclaimed boards should always be checked carefully for nails, screws, staples, and other metal before planing.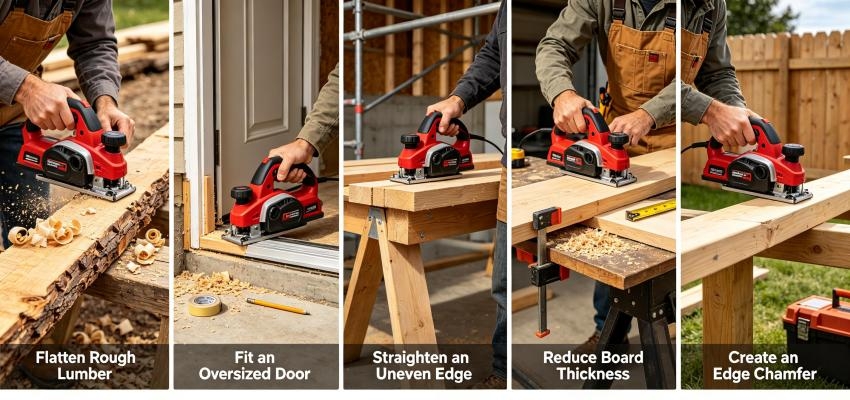
What You Need to Do Before Using an Electric Planer
Before starting, read the instructions for your specific planer. Controls, blade systems, maximum cutting depth, and recommended operating procedures can vary between models. Prepare a stable workbench, clamps, a measuring tool, a square, and a pencil. You should also use appropriate eye, hearing, and respiratory protection for the work environment.
Check the Workpiece
Inspect the board before placing the planer on it. Remove nails, screws, staples, or other metal objects that could contact the cutter. This is especially important when working with reclaimed lumber or old construction material. Make sure the board is properly supported. If the workpiece moves while you are planing, you can lose control of the tool and produce an uneven surface.
Check the Planer and Blades
Inspect the power cord, housing, fasteners, and blades before use. The blades should be sharp, clean, correctly installed, and securely fastened. Always disconnect the planer from power before changing blades or making adjustments that require access to the cutter area. Dull or damaged blades can produce a rough surface and make the tool work harder. If your planer uses reversible blades, follow the manufacturer's instructions for checking or replacing them.
How to Use an Electric Planer Step by Step
Once the tool and workpiece are ready, follow these steps.
Step 1: Secure the Workpiece
Plug the tool in only after inspection. Check the power cord for cracks or damage. Make sure the blades are sharp, clean, and tightly secured. Dull blades tear wood instead of slicing it and create rough, splintered surfaces. Spin the cutter head gently by hand to confirm nothing sticks or rubs. If the blades are chipped or dull, replace them before starting.
Step 2: Set a Shallow Cutting Depth
Use the depth adjustment to select a shallow cut, especially when you are learning how to use an electric planer. There is no single depth setting that works for every planer or type of wood. Start conservatively and stay within the maximum cutting depth specified by your tool's manual.
If you need to remove a significant amount of material, make several shallow passes instead of attempting one deep cut. This gives you better control and reduces the chance of tear-out or motor overload. You can mark the desired finished dimension on the edge of the board so you can check your progress as you work.
Step 3: Position the Planer Correctly
Clamp your board tightly onto your workbench. Make sure the surface you will plane sits flat and stable. Wobbly wood will lead to uneven cuts. Double-check that the marked lines are visible and clear. Clear away loose debris from the bench. Any small object under the board can lift it and ruin your planing pass.
Step 4: Start the Planer Before Contact
Start the planer according to the manufacturer's instructions and allow the cutter to reach full operating speed before beginning the cut. With the front shoe supported on the wood, move the tool forward in a controlled motion. Do not drop a stationary planer onto the workpiece. Starting the cutter before contact allows the blades to reach their intended operating speed before they begin removing material. If you are unsure about the setting, make a test pass on scrap wood first. This lets you check the cutting depth and surface quality without risking your finished workpiece.
Step 5: Make a Steady Pass Along the Board
Move the planer forward at a controlled and consistent speed. Do not force the tool through the wood. Let the cutter do the work. Whenever possible, work in a direction that supports the wood grain to reduce tear-out. Grain direction can change around knots and irregular areas, so use a shallower cut and test the material when necessary.
Keep the planer flat throughout the pass. Avoid rocking it from side to side or changing direction suddenly. Never pull a running planer backward across the workpiece. If you need to reposition the tool, follow the manufacturer's instructions and wait until the cutter has stopped before placing or moving it in a way that could expose you to the blades.
Step 6: Control Pressure at the Start and End
One of the most common beginner mistakes is creating a dip at the beginning or end of the board. At the start of the pass, keep the front shoe firmly supported on the workpiece. As the planer moves forward and the rear shoe reaches the board, gradually shift your pressure toward the rear of the tool. Continue supporting the planer as the front shoe approaches the end of the board. Avoid pressing down heavily on the front or rear at the wrong time. This front-to-rear pressure transition helps keep the cutter at a consistent height and reduces unwanted hollows.
Step 7: Overlap Passes and Check the Surface
If the board is wider than the planer, make overlapping passes across the surface. Slight overlap helps prevent raised ridges between adjacent cuts. After each few passes, stop and inspect the surface. Use a straightedge or square if you need to check flatness or edge alignment.
If you see deep grooves, ridges, or heavy tear-out, do not simply increase pressure. Check the blade condition, cutting depth, grain direction, and your feed technique. Make one or two light finishing passes when you are close to the desired surface.
Step 8: Turn Off, Disconnect, and Clean the Planer
When the job is finished, release the trigger and wait for the cutter to stop completely before setting the planer down. Disconnect the tool from power before cleaning or performing maintenance.
Remove accumulated wood shavings from the cutter area, vents, and other accessible parts using the cleaning method recommended by the manufacturer. Keep the blades clean and check them regularly for wear or damage. Store the planer in a dry, protected location where the blades will not be damaged.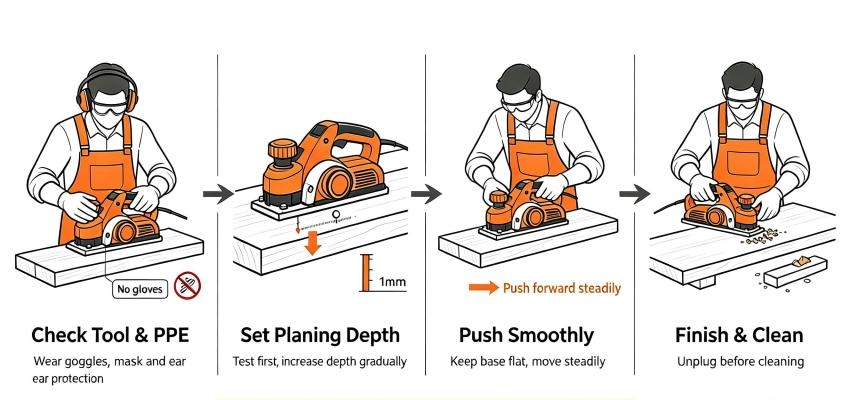
How to Get a Smoother Finish With an Electric Planer
- Always plane with the wood grain. Cutting against the grain pulls wood fibers up and creates bad tear-out.
- Keep your movement steady. Rushing creates dips and uneven surfaces.
- For hardwoods, use an even shallower cut depth and slower feed speed.
- When planing board edges, keep the planer square to the side of the workpiece to avoid tilted edges.
- Check blades regularly. Sharp blades deliver cleaner cuts and put less stress on the motor.
Common Electric Planer Mistakes to Avoid
- Cutting Too Deep: Trying to remove too much material in one pass can overload the motor and increase tear-out. Start shallow and make additional passes when necessary.
- Moving Too Fast: A fast or inconsistent feed can leave an uneven surface. Move at a controlled pace and allow the cutter to remove material without forcing the tool.
- Failing to Secure the Wood: A moving workpiece makes it difficult to maintain a consistent cut and can create a dangerous loss of control. Clamp the board securely before starting.
- Planing Against Difficult Grain: Cutting in an unfavorable grain direction can cause tear-out and splintering. Watch the grain and reduce the cutting depth when working around changing grain.
- Dipping at the Start or End: Uneven pressure can create hollows near the ends of the board. Keep the planer supported and gradually transfer pressure from the front shoe to the rear shoe during the pass.
- Planing Over Nails or Screws: Never assume reclaimed or old wood is free of metal. Inspect the workpiece before planing and remove any nails, screws, staples, or other objects that could damage the blades.
- Using Dull or Poorly Installed Blades: Dull blades can leave rough marks and increase cutting resistance. Check the blades regularly and install replacements according to the manufacturer's instructions.
- Pulling the Planer Backward: Do not pull a running planer backward across the wood. Stop and reposition the tool safely instead.
Electric Planer Problems and Quick Fixes
Even with careful use, your electric planer can run into common issues while working on wood. Most problems don’t need professional repair and can be solved right on your workbench with simple checks. Learn to spot these typical faults and apply fast fixes to get your planer back in shape for your woodworking tasks.
| Problem | Possible Cause | What to Check |
| Tear-out | Grain direction or excessive cut | Reduce depth and check grain |
| Dips at board ends | Incorrect pressure | Shift pressure gradually from front to rear |
| Uneven surface | Planer tilted or inconsistent movement | Keep both shoes flat and use steady passes |
| Rough finish | Dull or damaged blades | Inspect or replace blades |
| Motor bogging | Cutting too deeply or feeding too aggressively | Reduce depth and slow the feed |
| Ridges between passes | Insufficient overlap | Slightly overlap adjacent passes |
Frequently Asked Questions
Q: Is an Electric Planer Good for Beginners?
A: Yes. An electric planer can be a useful beginner woodworking tool when used correctly. Start with shallow cuts, secure the workpiece, practice on scrap wood, and follow the safety instructions for your specific model.
Q: How Deep Should a Beginner Set an Electric Planer?
A: Start with a shallow setting and increase it gradually when necessary. The correct maximum depth depends on the planer and material, so always follow the manufacturer's specifications rather than relying on one universal measurement.
Q: Can You Plane Against the Wood Grain With an Electric Planer?
A: It is generally better to work in a direction that supports the grain because this reduces the risk of tear-out. When the grain changes direction, use a shallower cut and test your approach on scrap wood first.
Q: How Do I Stop My Electric Planer From Leaving Marks?
A: Check the blade condition, cutting depth, feed speed, and pressure technique. Keep the planer flat, use consistent passes, and make light finishing passes when needed.
Q: Can an Electric Planer Flatten a Warped Board?
A: It can remove high spots and improve an uneven board, but flattening a severely warped board requires careful technique and proper support. A handheld planer also requires more operator control than a stationary machine designed for consistent thickness.
Q: Can I Use an Electric Planer to Trim a Door?
A: Yes. Trimming a small amount from a door is a common application for a handheld electric planer. Mark the amount to remove, secure the door properly, use a shallow setting, and make controlled passes.
Q: Do I Need to Sand After Planing Wood?
A: Often, yes. Planing can leave fine blade marks or slight ridges. Light sanding can remove these marks and prepare the surface for paint, stain, or another finish.
Conclusion
Learning how to use an electric planer is mainly about controlling the tool rather than forcing it through the wood. Start by inspecting and securing the workpiece, choose a shallow cutting depth, keep the planer flat, and make steady passes along the grain whenever practical. Pay particular attention to pressure at the beginning and end of each pass. Use multiple light cuts instead of trying to remove too much material at once, and inspect the surface as you work.
If you are a beginner, practice on scrap wood before moving to your final project. With the right setup, sharp blades, and consistent technique, an electric planer can quickly become a useful tool for flattening boards, trimming edges, fitting doors, and completing everyday woodworking projects. If you are looking to purchase a suitable tool, I highly recommend you come to Tool.com. Here, you will find a wide variety of high-quality products at reasonable prices. I hope you can choose the one that suits your preferences.