
Foam is a versatile material used for everything from cosplay and crafts to model making, insulation, props, and home projects. But if you are new to foam cutting, choosing the right tool and technique can make a big difference. So, how do you cut foam cleanly and accurately?
The best method depends on the type, thickness, density, and shape of the foam. A utility knife can work well for simple cuts, while an electric knife or foam cutter may be better for thicker materials, curves, and detailed shapes. For some compatible foams, a hot wire foam cutter can create smooth, controlled cuts by melting through the material rather than forcing a blade through it.
This guide explains how to cut different types of foam, which tools to use, how to get cleaner results, and which common mistakes to avoid.
- What Types of Foam Can You Cut?
- What Is the Best Tool for Cutting Foam?
- How to Cut Foam Step by Step?
- How to Cut Foam Cleanly and Precisely?
- How to Cut Foam for Different DIY Projects?
- Common Beginner Mistakes When Cutting Foam
- Foam Cutting FAQs
- Final Thoughts
What Types of Foam Can You Cut?
Hot knife relies on thermal cutting: the heated blade of a foam cutter melts through thermoplastic foam to create smooth, sealed edges with minimal loose debris. Unlike utility knives or saws that tear and leave frayed borders, hot knives fuse the foam surface as they cut. However, this method only works reliably on meltable thermoplastic foams. Foams made from non-thermoplastic materials will burn instead of melting, releasing thick smoke, unpleasant odors and potentially harmful fumes, while leaving rough, charred edges. For more information on foam cutter, you can explore detailed reviews on tool.com.
The table below breaks down widely used foam materials, their compatibility with handheld hot knife foam cutters, key traits, and typical real-world applications for hobbyists, makers, packaging fabricators and workshop professionals.
| Foam Material | Cut with Hot Knife? | Material Notes | Common Applications |
| Eva Foam | Yes | Flexible, firm closed‑cell foam; adjustable temperature recommended | Cosplay armor, costume props, custom DIY crafts, shoe padding |
| Eps Foam | Yes | Lightweight, low melting point; delivers clean cuts | Packaging inserts, architectural scale models, craft decorations |
| Xps Foam | Yes | Rigid insulation foam; requires higher blade temperature | Building insulation, model construction, outdoor signage |
| EPE Pearl Foam | Yes | Soft, shock‑resistant closed‑cell foam | Protective product packaging, equipment cushioning |
| PU Sponge (Closed-cell) | Yes | Dense sponge foam; avoid overheating | Display case inserts, custom packaging padding |
| KT Board | Yes | Light composite foam board, easy to cut | Event signage, exhibition displays, school art projects |
| PP Foam | Yes | Tough, oil‑resistant lightweight foam | Industrial packaging, lightweight mechanical prototypes |
| Open-cell Polyurethane Foam | Not recommended | Burns rather than melting, generates heavy smoke | Upholstery padding, mattress foam |
| Latex / Natural Rubber Foam | Not recommended | Combusts, creates toxic fumes and strong odor | Mattresses, soft cushioning |
Always identify your foam material before you start cutting. Closed-cell thermoplastic varieties like EPS, EVA and XPS perform best with handheld hot knife foam cutters. Tuning the tool temperature to match your foam density further reduces smoke and prevents edge melting or warping. Thin, low-density foams need lower heat settings, while rigid thick boards require higher temperatures for steady cutting.
If you are unsure about your foam type, run a small test cut on a scrap piece first. Never use a hot knife on unknown open-cell or rubber-based foams, as hazardous smoke may occur. Handheld hot knife foam cutters handle the full range of meltable foams listed above, ideal for hobby crafting, prototype building and custom packaging fabrication.
What Is the Best Tool for Cutting Foam?
For beginner crafters, DIY enthusiasts, packaging makers, and small-scale fabricators, choosing the right foam cutting tool is critical for achieving clean, professional-looking results. Many new users rely on traditional cutting tools like utility knives and hand saws, but these basic tools often leave jagged edges, excessive foam dust, and uneven cuts. They also require extra time for trimming, sanding, and cleanup, greatly lowering working efficiency. To save time and produce consistent, high-quality finishes, it is essential to pick a tool designed specifically for foam processing.
Foam cutting tools vary widely in precision, portability, material compatibility and cutting smoothness. Each option carries unique strengths and drawbacks, and no single tool fits every project. Below is a breakdown of popular foam-cutting tools to help beginners select the best match for their workflow.
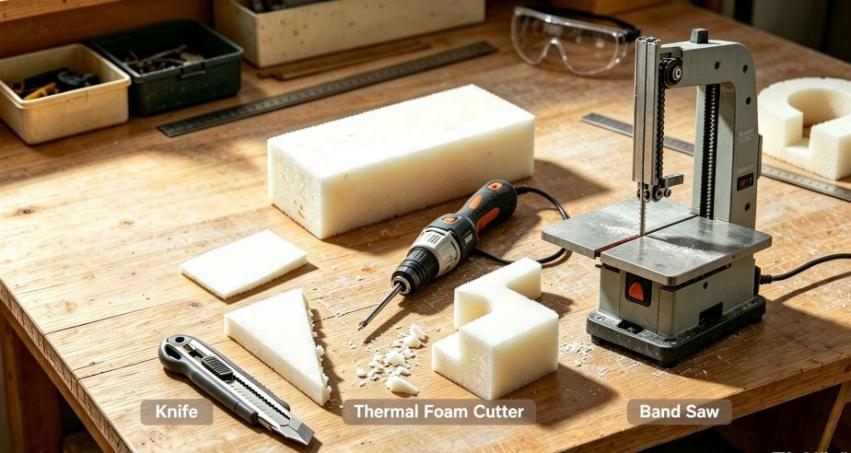
Utility Knife
A utility knife is the most common hand tool many people grab first for simple foam work. Here is what you need to know:
- Pros: Low cost, easy to use, no special power supply required.
- Cons: Leaves ragged edges; generates lots of foam crumbs.
- Best for: Beginners and casual hobbyists, simple rough trimming work, thin foam sheets where perfect edge finish is unnecessary.
Hand Saw
When you need to slice through thick foam blocks on a tight budget, a hand saw is one simple option. Keep these traits in mind:
- Pros: Cuts thick foam blocks at low cost
- Cons: Creates rough surface finish; low cutting precision
- Best for: Budget users, non-critical rough shaping projects, thick foam blocks where fine details and smooth edges are not required
Desktop Hot Wire Cutter
This stationary hot wire tool is built for clean, straight cuts and is widely used by model builders. Its key characteristics are as follows:
- Pros: Produces ultra-smooth straight cuts by melting foam.
- Cons: Fixed stationary setup; limited ability to cut curved or complex shapes.
- Best for: Professional model makers, flat foam sheets and architectural scale models, projects that mainly need clean straight cuts.
Handheld Hot Knife Foam Cutter
If you want flexibility to cut both straight lines and custom curved shapes, this handheld thermal cutter is a versatile pick. Review its advantages and limits:
- Pros: Makes smooth sealed edges; cuts both straight and curved lines; adjustable temperature; available in corded or cordless versions
- Cons: Only compatible with thermoplastic foam; ventilation is required during operation
- Best for: DIY enthusiasts and cosplay creators, handmade crafts, cosplay props, custom packaging and signage projects
A handheld hot knife foam cutter stands out as the best all-around choice for beginners after comparing all mainstream cutting methods. It perfectly solves the common pain points of traditional tools, including messy debris, rough edges, and low precision. Equipped with fast heating and multi-step temperature adjustment functions, professional handheld foam cutters adapt to various materials such as EPS, EVA, XPS, EPE, and KT board, covering most daily foam cutting and grooving needs. Explore the handheld hot knife foam cutter collection to view available models.
Once the cutting tool is selected, the next key factor is foam material compatibility. Not every cutter works well on all foam types. The table below shows which materials can be processed with a hot knife, utility knife and band saw.
| Foam Material | Hot Knife | Utility Knife | Band Saw |
| Eva Foam | √ | √ | × |
| Eps Foam | √ | √ | × |
| Xps Foam | √ | √ | × |
| EPE Pearl Foam | √ | √ | × |
| PU Sponge (Closed-cell) | √ | √ | × |
| KT Board | √ | √ | × |
| PP Foam | √ | √ | × |
| Open-cell Polyurethane Foam | × | √ | × |
| Latex / Natural Rubber Foam | × | √ | × |
Whether you need cordless portable tools for outdoor work or high-power options for precise cuts on thick foam boards, handheld hot knife foam cutters offer compatible and cost-effective solutions. Compared with bulky desktop equipment, handheld designs deliver great flexibility and broad material compatibility. They are one of the most practical, beginner-friendly options for long-term foam processing projects.
How to Cut Foam Step by Step?
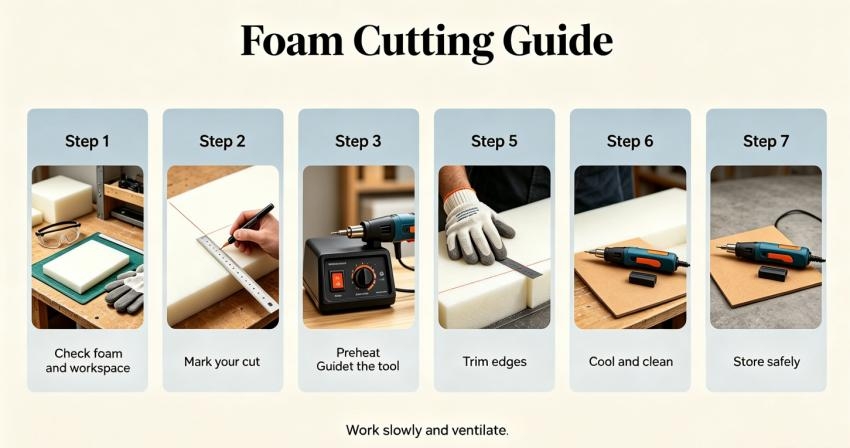
Foam cutting looks simple for beginners, but small mistakes can leave melted residue, uneven edges, warped shapes or wasted material. Unlike regular blades that cut with force, hot knife foam cutting relies on steady temperature control and careful technique. Follow this beginner-friendly workflow, and you will create clean, smooth, dust-free cuts on compatible thermoplastic foams, including EPS, EVA, XPS, EPE and KT board. This universal step-by-step guide works with all portable foam cutter models. It covers pre-cut preparation, cutting operation and post-use care.
Step 1: Check Your Foam and Set Up a Safe Workspace
Start every project by verifying your foam material and preparing a secure cutting environment. This simple preparation helps you avoid safety risks and poor cutting results.
- Confirm your foam material. Hot knives only work safely on meltable thermoplastic foams.
- Avoid latex foam and open-cell polyurethane foam.
- Choose a well-ventilated work area with a flat, stable workbench.
- Keep all flammable items away from your workspace.
Step 2: Mark Clear Cutting Lines
Precise marking is the foundation of neat cuts. Take time to lay out your pattern properly before you begin cutting.
- Use a fine-tip marker, ruler or paper template to draw straight lines, curved outlines or grooving paths on the foam surface.
- For custom craft shapes, tape your template firmly onto the foam to prevent shifting while cutting.
- Freehand cutting is not recommended for new users.
- Careful marking reduces errors and gives your project a professional finish.
Step 3: Preheat the Tool and Adjust Temperature
Heat setting directly controls cutting quality. Match the temperature to your foam’s thickness and density.
- Power on your handheld foam cutter and set the temperature based on your foam’s thickness and density.
- Thin, low-density foams such as EPS and EPE need low to medium heat. Too much heat will melt the edges and cause collapse.
- Thick rigid foams like XPS board and high-density EVA require higher temperature to cut through in one smooth pass.
- Wait until the blade reaches a stable working temperature before cutting. Never cut with a cold blade.
Step 4: Make the Cut
This is the core step of hot knife operation. Remember heat melts the foam, pressure does not.
- Place the heated blade gently at the start of your marked line. Do not press down hard or force the blade forward.
- Keep a slow, consistent speed as you move the blade.
- For straight cuts, hold the blade vertical and follow your line steadily. For curves, slowly adjust the blade angle to match the outline.
- Avoid repeated back-and-forth passes, which will create rough edges.
Step 5: Groove or Trim (Optional)
Many projects need edge refinement or recessed grooves. You can do fine shaping after completing the main cut.
- Use a matching blade for fine shaping after your main cut if your project needs grooves or edge finishing.
- Thermal cutting creates clean grooves without extra sanding.
- Lightly trim small melted blobs along the edge for a cleaner look.
- Hot knife trimming saves hours of post-processing work compared with manual blades.
Step 6: Cool the Tool and Clean Residue
Proper cooling and cleaning protect both you and your cutter for repeated use.
- Once you finish cutting, turn off the power and rest the cutter on a heat-resistant stand to cool. Never touch the hot blade to prevent burns.
- After the blade fully cools, wipe off melted foam buildup.
- This keeps the blade clean and maintains consistent heating for your next project.
- Clean your workbench afterward. Hot knife cutting produces almost no flying foam dust.
Step 7: Store and Maintain Your Foam Cutter
Good storage and regular maintenance preserve cutting performance and extend the tool’s lifespan.
- As soon as fully cooled, store your foam cutter in a dry, ventilated spot away from moisture, dust and direct sunlight.
- Protect the heating blade from accidental knocks, heavy pressure or bending during storage.
- Simple regular maintenance extends the tool's service life, keeps heating performance stable and reliable.
- It preserves consistent cutting precision for future DIY crafts, small-batch production work or on-site installation and fabrication jobs.
With this simple, repeatable process, total beginners can master foam cutting easily. You will consistently get smooth, dust-free foam parts for cosplay, custom packaging, scale models and signage projects.
How to Cut Foam Cleanly and Precisely?
Getting clean, sharp foam cuts is the goal for every beginner. It’s frustrating to spend time marking out a project, only to end up with melted blobs, lopsided edges or distorted curves. The good news is that neat, precise cuts don’t require fancy skills — they come from simple habits and small adjustments when you use your hot knife.
Keep a Consistent Cutting Speed
Speed is one of the biggest secrets to clean foam edges. Follow these steps for steady cutting speed.
- Do not rush the blade along your marked line. Moving too fast leaves jagged, incomplete cuts.
- Avoid moving too slowly. Excess heat will build up and melt a wider area, creating thick, bulgy edges.
- Glide the blade steadily, letting the heat do the work instead of forcing the blade forward.
- Maintain a smooth, even pace to get thin, sealed edges with minimal melted residue.
Match Blade Angle to Your Cut
The blade angle changes your finished edge. Follow these steps to control your blade angle.
- For straight vertical cuts, hold the blade straight up and down. This creates square, clean edges.
- When cutting curves or angled profiles, tilt the blade gently as you follow the marked line.
- Avoid big, sudden angle shifts, which can nick the foam and leave uneven spots.
- Never rock the blade back and forth over the same line; repeated heating ruins the edge finish.
Pick the Right Blade for Your Shape
Many foam cutters come with interchangeable blades. Follow these steps to select the correct blade.
- Use straight blades for long straight cuts and deep slicing.
- Choose curved or specialty blades for rounded contours, grooves and detailed craft shapes.
- Select a blade that matches your project to reduce heavy trimming after cutting.
Watch Your Temperature Setting
Temperature control directly affects how clean your cut will be. Follow these steps to set proper heat.
- Use mild heat for low-density foam like EPS and EPE. High heat will over-melt and warp these lighter materials.
- Use higher heat for denser foam such as XPS and high-density EVA, for one-pass clean slicing.
- Always test your temperature on a scrap piece of the same foam first.
- This quick test helps you avoid ruining your main workpiece before you start.
Small Pro Tip for Sharp Corners
Corners are where most beginners mess up clean cuts. Follow these steps for crisp corners.
- Stop blade movement when you reach the corner point.
- Keep the blade in place for a second.
- Rotate the foam or slowly reposition the blade to follow the new marked line.
- This simple trick prevents rounded, blobby corners and keeps your outlines crisp.
Once you pick up a few simple tricks, every cut you make will look clean and polished. Whether you’re building cosplay armor, designing custom packaging, or crafting scale models, small tweaks go a long way to get consistent, neat results when working with a handheld hot knife.
If you’re working outdoors or in spaces without easy access to power, a handheld hot knife foam cutter kit with cordless heating is perfect for all kinds of foam-cutting projects.
How to Cut Foam for Different DIY Projects?
Foam is such a flexible material, and it pops up in all kinds of fun DIY builds. The way you cut foam changes slightly depending on what you are making. Small tweaks to speed, temperature and blade choice will help you get great results no matter your project. Below we walk through popular real‑world uses that work perfectly with thermoplastic foams like EPS, EVA, XPS, EPE and KT board.
Cosplay & Costume Props
EVA foam is ideal for creating armor, helmets and weapon props, which often require flat panels, angled edges and smooth curves. Follow these steps for clean, professional costume pieces.
- Use medium-high heat setting for dense EVA foam.
- Hold the blade vertical for flat armor panels to get clean square cuts.
- Gently tilt the blade while moving along template outlines when making bevels or curved edges for helmets.
- Slow down on tight corners, pause to reposition foam for crisp edges and avoid messy melted blobs.
Custom Packaging & Case Inserts
This project focuses on precision cuts and custom recesses to hold items safely inside protective cases. Use these steps to create well-fitted foam inserts.
- Choose EPS or EPE foam for protective inserts of cameras, tools or handmade goods.
- Set the tool to medium heat and maintain steady movement.
- Cut precise straight lines and use grooving to carve recesses to hold items securely inside cases.
- Use a cordless foam cutter kit if you need to work across different workspaces without a power outlet.
Scale Models & Architectural Builds
Model building mixes large flat sections and tiny fine details. These steps help you balance speed and accuracy for miniature buildings and terrain.
- Select EPS and XPS boards for miniature buildings, terrain layouts and school model assignments.
- Cut large straight sections at a regular pace; slow down for small detailed features.
- Raise temperature for thick XPS insulation boards so the blade melts fully through in one smooth pass.
- Save scrap foam pieces to reuse for small landscape details.
Signs, Displays and Event Decor
Foam letters and decorative backdrops need smooth outlines and durable rounded corners. Use this simple workflow for beginner-friendly decorative projects.
- Use KT board or low-density EPS for foam letters, retail displays and party backdrops.
- Tape your letter or shape template firmly onto the foam surface first.
- Cut slowly along the outline, especially around rounded letter corners.
Craft and Theater Props
Stage decorations and lightweight craft pieces vary a lot in thickness. Adjust your heat setting properly with these steps to avoid melting damage.
- Adjust heat levels according to foam thickness.
- Use lower temperature for thin decorative pieces to prevent over-melting.
- Apply higher heat for thicker block-style props to achieve smooth penetration.
- Keep your workspace well-ventilated during long crafting sessions.
Every DIY project comes with its own small quirks, but you don’t have to learn brand-new skills every time you start something new. Just tweak your temperature setting, pick the right blade, and adjust your cutting speed to suit your foam material and what you want to make. This way, you’ll get steady, clean cuts no matter what foam creation you’re working on.
If you do lots of regular DIY foam crafting, a handheld hot knife foam cutter works great for PP, EPS and EVA materials and handles all your everyday precision cutting tasks.
Common Beginner Mistakes When Cutting Foam
Even simple foam cutting can go wrong when you are new to hot knife tools. Many of these errors come from tiny, easy-to-fix habits. Knowing what to watch out for will save you wasted foam, frustration and messy projects.
Pushing or Forcing the Blade Through Foam
Most beginners rely on physical force to cut faster, which is the biggest misunderstanding of hot knife operation.
- Mistake: Beginners often push hard to speed up cutting.
- Cause: A hot knife cuts by melting foam, not by slicing with pressure. Heavy pressure tears foam and creates jagged edges.
- Fix: Let blade heat finish the cutting work. Move the blade slowly and gently along marked lines.
Skipping a Test Cut on Scrap Foam
Many beginners start cutting directly on formal materials without testing, which easily causes unnecessary waste.
- Mistake: Users cut the main workpiece directly without testing.
- Cause: Foam density varies widely. Heat suitable for thin EPS may warp thick EVA.
- Fix: Test temperature first on leftover scraps from the same foam sheet. This quick check prevents over-melting and ruined projects.
Making Sharp Turns While the Blade Is Moving
Corner cutting is a tricky detail for new users. Hasty turning always ruins clean foam outlines.
- Mistake: Users twist the blade while cutting around corners.
- Cause: Moving the blade during turns creates rounded, lumpy corners instead of crisp outlines.
- Fix: Stop at the corner. Keep the blade steady briefly. Rotate foam or reposition the blade, then continue cutting..
Using the Wrong Blade for Your Cut
Different cutting scenarios require matched blade types. Using a single blade for all tasks leads to poor finishing results.
- Mistake: Using straight blades for deep grooves or tight curves.
- Cause: Mismatched blades produce rough, uneven cuts. Different blade shapes fit different tasks.
- Fix: Use straight blades for long flat cuts. Choose curved blades for contours and recessed grooves. Match your blade to your project to reduce later trimmin.
Ignoring Ventilation While Cutting
Hot knife cutting produces faint fumes that are easy to ignore, but poor ventilation affects long-term operation comfort.
- Mistake: Cutting foam in closed, airless rooms.
- Cause: Hot knives release light fumes when melting thermoplastic foam. Fumes irritate your nose and throat.
- Fix: Open a window or use a small fan to circulate air. Ensure good airflow, especially for long crafting sessions.
Touching the Blade or Resting It On Work Surfaces
The hot knife blade retains high temperature for a long time after use, bringing hidden safety risks for careless operation.
- Mistake: Touching hot blades or placing them directly on the workbench.
- Cause: The blade stays hot long after power-off. Hot blades leave burn marks and bring fire risks.
- Fix: Never touch the blade during use or right after shutdown. Always place the hot knife on its heat-resistant stand.
Cranking Heat Too High to Cut Faster
Most new users mistakenly believe higher temperature means higher cutting efficiency, which actually damages foam materials.
- Mistake: Turning heat up to maximum for faster cutting.
- Cause: Excess heat melts a wide zone around the blade, leaving swollen, distorted edges. Higher heat does not mean cleaner, faster cuts.
- Fix: Start at a low temperature. Increase heat gradually until you get smooth, clean cuts.
These beginner mistakes are really easy to avoid once you know them. Slow down, test first, and respect how your hot knife works. Your foam projects will look cleaner and you will waste far less material.
Foam Cutting FAQs
Q: Can I cut all types of foam with a hot knife?
A: No. Hot knives only work for thermoplastic foams. EPS, EVA, XPS, EPE and KT board are safe to melt and cut. Avoid polyurethane foam or open‑cell foam; these release harmful fumes when heated.
Q: Why are my foam edges bubbly and melted?
A: Your temperature is too high or you are moving the blade too slowly. Excess heat melts a wider area around the cut. Lower the heat or glide the blade a little faster for thinner, cleaner sealed edges.
Q: Can I cut curves and corners with a hot knife?
A: Yes, you can, with a simple technique. Move slowly for curves. Stop at corners, hold the blade steady, then rotate the foam rather than twisting the blade while moving. This keeps outlines sharp.
Q: Is a cordless foam cutter as powerful as a handheld wired hot knife?
A: It works great for most DIY foam projects. The cordless foam cutter kit offers enough heat for EPS, EVA and XPS. The handheld hot knife delivers continuous power for longer, heavy‑duty cutting sessions.
Q: How do I clean melted foam residue off the blade?
A: Clean the blade only after it fully cools down. Once cold, gently scrape away hardened foam buildup. Never wipe a hot blade with cloth, which can burn or catch fire.
Final Thoughts
Hot knife foam cutting is an approachable hobby skill that creates smooth, sealed foam edges without messy crumbs. Small tweaks to heat, blade angle and movement speed make all the difference for your creative builds. Take time to test settings on scrap foam before starting, and steer clear of typical beginner missteps. Always prioritize ventilation and safe handling when working with a heated blade.
Choose the cordless foam cutter kit if you value mobility for on‑site custom work, or grab the handheld hot knife for extended cutting sessions in your workshop. With a little practice, you can consistently produce clean foam cuts for whatever DIY project you dream up.